In this example we are going to connect to DHT11 and or DHT22 humidity & temperature sensor. This sensor reads both the humidity and temperature.
(This guide was updated on 24. Oct 2015, greatly improving the DHT11 device driver code and added DHT22 device driver code and wiring pictures for the DHT22)
The DHT22 has higher resolution but similar protocol. The DHT22 sensor is far superior over the DHT11, it gives far better and more correct readings and handles negative temperature as well.
Note that many types of those sensors exist, I had a 3 pin type, they also exist with 4 pins.
Disclaimer:
We do not take any responsibility for possible errors in the guide or errors that you might do wiring it up. Incorrect wiring can result in damaged sensor or damaged Raspberry PI.
Pieces we use are:
- Raspberry PI 2
- Cobbler and Cobbler cable
- DHT11 or DHT22 (They go as low as $4.91 for 5 pieces ($0.98 a piece) on Aliexpress where I got this one. The far nicer DHT22 sensor costs about $3.45 a piece. The DHT22 tends to cost a little bit more but if you want good data then go DHT22
- Wiring PI Xojo module from Paul Lefebvre
First thing is connecting the sensor:
For the DHT11 then wiring was as follows:
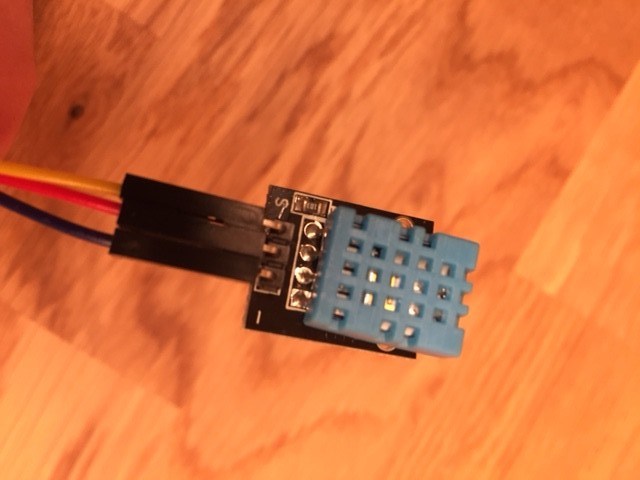
- (5V) Red is the 5V input – I always use red for the power input.
- (GPIOX) Yellow is the Data pin, it was marked S on the sensor.
- (GND) Blue is the ground, it was marked – on the sensor.
Be sure to check the markings on your sensor as there are a lot of types of this particular sensor.
Spec on the DHT11:
- The working voltage of 3.3V to 5V
- Measurement Range: Humidity 20-90%RH, Temperature 0~50℃
- Accuracy: Humidity +-5%RH, Temperature +-2℃
- Resolution: Humidity 1%RH, Temperature 1℃
- Can be polled once every second
For the DHT22 that I had then it was as follows:

- (5V) Red is the 5V input – I always use red for the power input.
- (GPIOX) Yellow is the Data pin, it was marked Out on the sensor. (I could not make out what it was trying to say on front but when turning it around then it says “Out”)
- (GND) Blue is the ground, it was marked – on the sensor.
Spec on the DHT22:
- Measurement Range: Humidity 0-100%RH, temperature -40~80℃
- Accuracy: Humidity ±2~5%RH, temperature ±0.5℃
- Resolution: Humidity 0.1%RH, temperature 0.1℃
- Can be polled once every 2 seconds
Connecting to the Cobbler:
Make sure your Raspberry PI is not powered on when you do the connections.


In my example then I have it connected as follows:
- Red to pin 2 (5V)
- Blue to pin 25 (GND)
- Yellow to GPIO 6 which is pin 31.
The complex protocol this sensor uses
Data pin is pulled down to low for at least 10ms to send start signal to the sensor. Then pin is put to high for 40 microseconds.
The sensor will pull down the pin to low for 80 ms, and then back up to high for 80 ms before sending the actual data.
Then it starts sending the data where every bit starts with 50 microsecond LOW, then the time length of the HIGH determines if its 0 or 1.
DHT11 and DHT22 use the bits a little bit differently see the Xojo modules for the code of that.
The Xojo code:
Interfacing with this sensor is complex, and it felt as if I was writing a device driver.
Our syntax highlighter tends to mess up the code so I will include the Xojo modules that act as device drivers as links here.
In the Open event of my window I placed this code:
Sub Open()
  GPIO.SetupGPIO
End Sub
I put this code on button:
Sub Action()
 Dim result as Integer
 Dim humidity as Single
 Dim temperature as Single

 result = DHT22.ReadSensor(6,humidity,temperature)

 if result = 0 then
 MsgBox "Humidity = " + Format(humidity,"#.0") + " % -- Temperature: " + Format(temperature,"#.0") + " ℃"
 elseif result = -1 then
 MsgBox "Timeout error"
 elseif result = -2 then
 MsgBox "Checksum error"
 end if
End Sub
For DHT11, just change the DHT22 to DHT11 in the code above and use the DHT11 module in your project.
Note that this sensor will have timeouts and checksum errors at times. Then you just call for new reading on it.